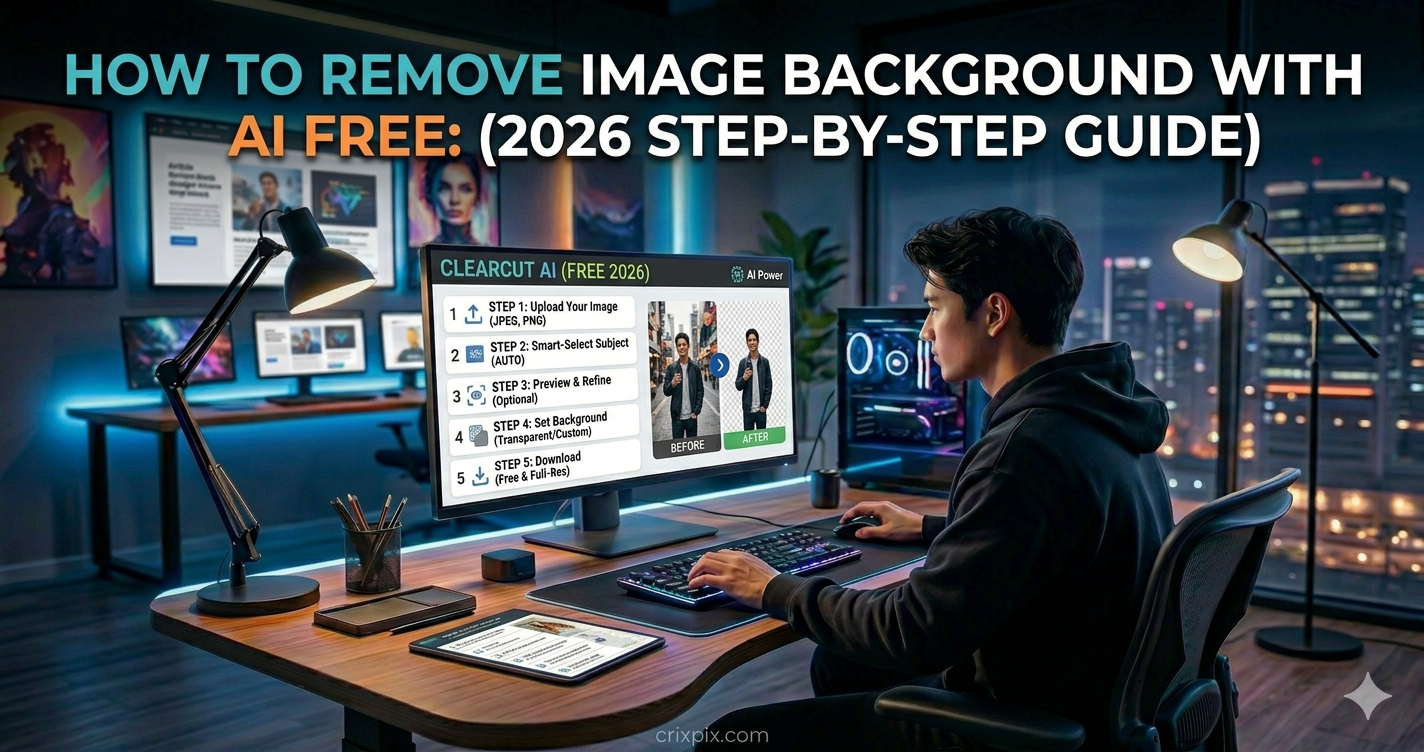
How to Remove Image Background with AI Free (2026 Step-by-Step Guide)
Want to know exactly how to remove image background with AI free in 2026? You are in the right place. Removing image backgrounds used to require hours in Photoshop and professional design skills. Today, AI does it in under 5 seconds — for free — with results that are often cleaner than manual editing. In this complete guide, we walk you through 5 different free methods step-by-step, covering every major tool: Remove.bg, Adobe Express, Canva, Pixelcut, and Pixlr. We also cover the best use cases, common mistakes to avoid, pro tips for clean edges, and exactly when to use each tool.
📋 Table of Contents
- What Does AI Background Removal Actually Do?
- Who Needs to Remove Backgrounds?
- Method 1 — Remove.bg (Best Accuracy)
- Method 2 — Adobe Express (Best Free Unlimited)
- Method 3 — Canva (Best All-in-One Design)
- Method 4 — Pixelcut (Best Unlimited Free)
- Method 5 — Pixlr (Best Free High-Resolution)
- Which Method Should YOU Use?
- Complete Free Workflow: Remove + Design + Publish
- 5 Mistakes That Ruin Your Background Removal
- 8 Pro Tips for Perfectly Clean Cutouts
- Frequently Asked Questions
What Does AI Background Removal Actually Do?
Before we dive into how to remove image background with AI free, it helps to understand what is actually happening behind the scenes — because understanding this helps you get better results.
AI background removal uses deep learning models called semantic segmentation networks — neural networks trained on millions of labelled images where every single pixel was classified as either “subject” or “background.” When you upload your image, the AI processes it at multiple resolutions simultaneously, identifying the subject by its shape, texture, colour contrast, and depth cues — then separates it from the background with pixel-level precision.
Modern AI background removers in 2026 can handle what used to be the hardest challenges in manual editing: individual hair strands, fine fur, transparent glass, semi-transparent fabric, and complex product shapes with shadows and reflections. Results that previously took 20–45 minutes of careful Photoshop masking now take 3–5 seconds automatically.
Who Needs to Remove Image Backgrounds? (Real Use Cases)
For a deeper look at the best tools available, see our full guide on the best free AI background removers in 2026 — where we compare 10 tools with real accuracy scores.
Method 1 — How to Remove Image Background Free with Remove.bg
Remove.bg — Best Overall Accuracy
1 Free/Day No Watermark Highest Accuracy 5 SecondsRemove.bg is the most accurate free AI background remover available in 2026 — achieving a 9.2/10 accuracy score in our testing, especially on portraits and fine hair. It has been in operation since 2018 and its model is trained on an enormous dataset of real-world images. Here is the full step-by-step process:
Step-by-Step: Remove.bg
✅ Best For
- Portrait photos with complex hair
- Fine fur and pet photography
- When accuracy matters more than volume
- Integrating with Photoshop via plugin
⚠️ Limitations
- Free plan: 1 image per day only
- Free download resolution: 0.25MP (low res)
- Full resolution requires paid credits
Method 2 — How to Remove Image Background Free with Adobe Express
Adobe Express — Best Free Unlimited with Full Resolution
Unlimited Free No Watermark Full ResolutionAdobe Express gives you unlimited background removals at full resolution with no watermarks — entirely free. It is powered by Adobe Sensei AI, the same engine behind Photoshop, making it exceptionally strong on complex subjects like glass, jewelry, and overlapping objects. After removing the background, you can immediately drop your subject onto a new template and design a finished graphic — all without leaving Adobe Express.
Step-by-Step: Adobe Express
✅ Best For
- Unlimited daily free removals needed
- Full-resolution output at no cost
- Creators who want to design immediately after removal
- Glass, jewelry, and complex transparent objects
⚠️ Limitations
- Requires a free Adobe account to download
- Slightly less precise on very fine flyaway hair vs Remove.bg
- Best design templates behind Premium plan ($9.99/month)
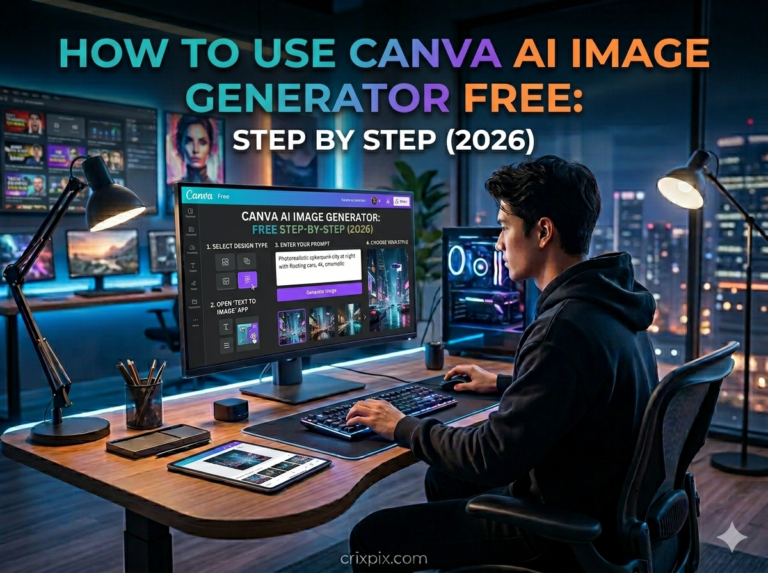
Method 3 — How to Remove Image Background Free with Canva
Canva Background Remover — Best for Designers in Canva
Canva Pro Feature No Watermark Best WorkflowCanva’s Background Remover is the most practical tool for creators already working inside Canva. One click removes the background without leaving your design — meaning you can immediately position your subject on a new backdrop, add text, and export a finished thumbnail or social post in minutes. It is a Canva Pro feature ($15/month), but if you already use Canva, it is the smoothest workflow available.
Not yet using Canva AI? Read our full guide on how to use Canva AI image generator free — it covers everything from Magic Media to Dream Lab in one place.
Step-by-Step: Canva Background Remover
Method 4 — How to Remove Image Background Free with Pixelcut
Pixelcut — Best Truly Unlimited Free Method
Unlimited Free No Watermark HD QualityPixelcut is the best method when you need to remove image backgrounds with AI free and unlimited — no daily caps, no watermarks, HD quality outputs. It also includes a built-in background replacement tool with hundreds of backgrounds to choose from, making it ideal for product photography and social media content at scale.
Step-by-Step: Pixelcut
✅ Best For
- High volume removals — no daily limit
- Product photography for online stores
- Mobile creators — excellent iOS and Android app
- When you need HD output at zero cost
⚠️ Limitations
- Slightly lower accuracy than Remove.bg on extreme hair detail
- Batch processing requires paid plan
Method 5 — How to Remove Image Background Free with Pixlr
Pixlr — Best Free High-Resolution Up to 4K
Unlimited Free No Watermark Up to 4096×4096pxPixlr offers unlimited free background removal with exports up to 4096×4096 pixels (4K resolution) — the highest free output resolution available in 2026. It is the only tool that gives you print-quality cutouts without paying anything. After removing the background, Pixlr drops you into a full browser-based photo editor with layers, filters, text tools, and colour adjustments.
Step-by-Step: Pixlr
Which Method Should YOU Use to Remove Image Background with AI Free?
Here is the exact decision guide — pick your method based on your specific need:
| Your Situation | Best Method | Why |
|---|---|---|
| Need the most accurate result possible | Remove.bg | 9.2/10 accuracy — best on hair, fur, fine details |
| Need unlimited free removals daily | Pixelcut or Adobe Express | No daily limits, no watermarks, HD quality free |
| Want to design immediately after removal | Adobe Express or Canva | Removal and design in one platform — no app switching |
| Already using Canva for thumbnails or posts | Canva BG Remover | One-click removal inside your existing Canva workflow |
| Need 4K / print-quality resolution for free | Pixlr | Only free tool exporting up to 4096×4096px |
| Removing backgrounds on your phone | Pixelcut mobile app | Best mobile background removal app — fully free |
| Sensitive images — need total privacy | Backgroundless.ai | Processes locally in browser — image never uploaded |
| Selling products on Amazon or Etsy | Photoroom or Pixelcut | Built for e-commerce product photography workflows |
Complete Free Workflow: Remove Background + Design + Publish
The most powerful free workflow in 2026 combines AI image generation, background removal, and design into one seamless process. Here is the exact step-by-step workflow used by top content creators and YouTubers:
Step 1 — Generate or Source Your Base Image
Use Leonardo AI (free, 150 images/day) to generate a custom AI background scene. Or use your own photograph as the subject you want to cut out.
Step 2 — Remove the Background
Upload your photo of yourself, your product, or your subject to Pixelcut (unlimited free) or Remove.bg (best accuracy, 1 free/day). Download the clean transparent PNG.
Step 3 — Import Into Canva
Open Canva, create a new design at your target dimensions (1280×720 for YouTube thumbnails, 1080×1080 for Instagram). Upload your transparent PNG cutout.
Step 4 — Place and Design
Drop your cutout onto the AI-generated background. Resize, position, and add your bold text overlays, logo, and brand colours using Canva’s free design tools.
Step 5 — Export and Publish
Download as PNG at full resolution. Upload directly to YouTube as your thumbnail, or publish to Instagram, LinkedIn, your blog, or anywhere else. Total cost: $0.
5 Mistakes That Ruin Your AI Background Removal
Mistake 1 — Saving as JPG instead of PNG
This is the most common mistake. JPG does not support transparency — it replaces your transparent background with solid white or black automatically. Always save background-removed images as PNG. Never JPG. Check your download settings every single time.
Mistake 2 — Using low-contrast source images
AI background removal accuracy drops significantly when your subject blends into the background — a person in a beige shirt against a cream wall, or dark hair against a dark background. For best results, use source images where the subject clearly contrasts the background. A small effort in shooting pays off enormously in removal quality.
Mistake 3 — Not checking the edges after removal
Every AI background remover occasionally misses small areas or over-crops fine details. Always zoom in to check your edges before downloading — especially around hair, fingers, and the outer edges of your subject. Use the manual brush tool (available in all 5 methods above) to fix any imperfections in 10–20 seconds.
Mistake 4 — Using a low-resolution source image
AI background removers work much better on high-resolution inputs. A blurry, pixelated, or heavily compressed source image makes it harder for the AI to detect precise edges. Always use the highest-quality version of your source image — ideally at least 1000×1000 pixels.
Mistake 5 — Not previewing on multiple backgrounds
A cutout that looks perfect on a white background may show rough edges or colour fringing when placed on a dark or coloured background. Always preview your cutout on both a light and a dark background before finalising. Adobe Express and Canva make this easy — just temporarily change the canvas colour to check.
8 Pro Tips for Perfectly Clean AI Background Removal in 2026
- Shoot against a contrasting background. The single biggest factor in removal quality is how different your subject looks from its background. A person against a plain white wall, or a product on a clean surface, removes dramatically cleaner than a complex outdoor scene.
- Use even, soft lighting. Harsh shadows falling behind your subject confuse AI models about where the subject ends. Soft window light or a diffused light source produces the most predictable, cleanest edges.
- Match your tool to your image type. Remove.bg is best for portraits and hair. Pixelcut and Photoroom are optimised for product shots. Pixlr is best for print-resolution needs. Always use the right tool for the job — see our full guide to the best free AI background removers in 2026.
- Use the manual brush for 10 seconds of refinement. Every tool has it. Zoom in to 200–300% after removal and spend just 10 seconds fixing any stray pixels or missed areas with the erase/restore brush. This small step transforms a good cutout into a professional one.
- Preview at actual display size. Always preview your finished cutout at the size it will appear when published — about 300px wide for YouTube thumbnails. Edges that look fine at 100% zoom can look rough at small display sizes. According to YouTube’s Creator Academy, thumbnails should always be checked at small size before publishing.
- Generate matching backgrounds with AI. After removing your background, use a free AI image generator to create a custom background that perfectly fits your subject and brand — instead of using generic stock images everyone else uses.
- Use batch processing for multiple images. If you regularly process more than 5 images, use Pixelcut’s free batch mode or Photoroom’s batch processor. Processing images one at a time is inefficient for e-commerce sellers and high-volume content creators.
- Convert PNG to JPG only as a final step. Keep everything as PNG throughout your editing workflow. Only convert to JPG as the very last step if a platform specifically requires it — and only do so after your design is completely finished, never during the editing process.
Frequently Asked Questions
How do I remove image background with AI for free?
The fastest way to remove image background with AI free is to go to remove.bg, click Upload Image, select your file, wait 5 seconds, and download the transparent PNG — no account required, no watermark. For unlimited free removals, use Pixelcut or Adobe Express instead, both of which have no daily limits on their free plans. All three tools are completely browser-based with no software to download.
Which AI tool removes backgrounds from images for free without a watermark?
Remove.bg, Pixelcut, Adobe Express, Backgroundless, Pixlr, Erase.bg, and Clipdrop all remove image backgrounds for free without adding any watermarks. The main exception is Photoroom, which adds a small watermark on its free plan. For unlimited watermark-free removals, Pixelcut and Adobe Express are the best free options in 2026.
Is remove.bg completely free to use?
Remove.bg offers a free tier that gives you one background removal per day at low resolution (0.25 megapixels). There is no watermark on the free download. For full-resolution downloads or more than one image per day, you need to purchase credits (starting from $0.10 per image) or a monthly subscription from $9/month. For unlimited free use, Pixelcut or Adobe Express are better alternatives.
What is the best format to save background-removed images?
Always save background-removed images as PNG files. PNG is the only common image format that supports true transparency — your transparent background is preserved exactly as the AI created it. If you save as JPG, the transparency is automatically replaced with solid white or black, destroying the transparent background. Only convert to JPG as a final step if a specific platform requires it.
How do I remove the background from an image without Photoshop?
You do not need Photoshop to remove image backgrounds in 2026. Free browser-based AI tools like Remove.bg, Pixelcut, Adobe Express, Canva, and Pixlr all remove backgrounds in 3–5 seconds with accuracy that often matches or exceeds manual Photoshop masking. No software download is required — all tools work directly in your browser on any device including smartphones.
Can AI remove backgrounds from photos with hair accurately?
Yes. Modern AI background removers in 2026 handle hair and fur with impressive accuracy using semantic segmentation models that process images at multiple resolutions to detect individual strands. Remove.bg achieved a 9.2/10 score in our hair accuracy test. For best results on complex hair, shoot against a high-contrast background and use even lighting — this dramatically helps the AI distinguish hair strands from the background.
How do I remove background from an image on my phone for free?
The best way to remove background from an image on your phone for free is the Pixelcut mobile app (iOS and Android) — completely free, no watermarks, unlimited removals. Adobe Express also works perfectly on mobile browsers. Canva’s mobile app includes background removal for Pro subscribers. All tools are available on both iPhone and Android with no quality difference from the desktop version.
🚀 Remove Your First Background Free Right Now
Go to pixelcut.ai for unlimited free removals — or remove.bg for maximum accuracy.
Then bring your cutout into Canva to design and publish in minutes.
Bookmark CrixPix.com for daily, honest guides to every AI tool that matters in 2026.